Adobe InDesign is the gold standard for multi-page layouts such as catalogs, books, magazines, manuals, annual reports—not to mention e-books or other electronic documents you may want to create as a free printable or lead magnet for your business!
In short: there simply is no better program for creating longer documents that require pagination. For this reason (and so many more!), I have compiled my top 10 InDesign tips below.
If you don’t have InDesign, you can try it out for FREE for 30 dayshere.
And you can download my FREE handy dandy 2-pg InDesign cheatsheet here:
1) using master pages
When you have a multiple-page document, such as a brochure or catalog, using master pages will save you tons of time! Master pages are used to automatically insert layout elements on pages so these are standard and consistent throughout your document—like a template. All elements of the master page (text boxes, page numbers, guides and/or graphic elements) are placed onto any page that uses that master.
If you’ve ever tried to select an element on a page in InDesign and were frustrated because you could not, it’s because that element was on the master and by default, they are not selectable. Why is that? Because this way you can further design the page without worrying about accidentally modifying the pre-defined template and ruining the consistency. And also, if you want to change an element, you just do it one time on the master and it’s updated throughout your file. Done!
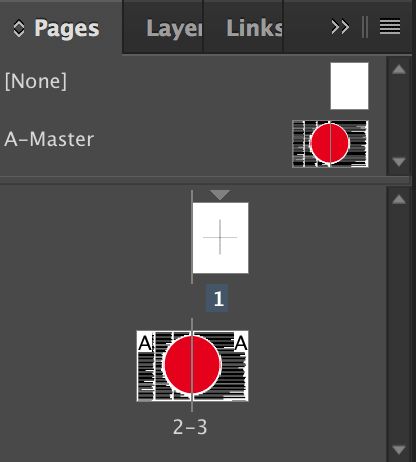
Okay, so how do you set up a master page? Easy, go to WINDOW / PAGES or otherwise select the PAGES palette and double-click on “A-Master.” Add all of the elements that are repeated throughout most of your document: guides, page numbers, text boxes, image frames, graphic elements, etc.
To apply this master page to new pages, simply drag it from the Master Pages pane onto the Pages pane in the palette. Alternately, you can select the OPTIONS menu (hamburger menu) at the top of the Pages panel and choose Apply Master To Pages to set the master for multiple pages. If you’ve already started working on layout elements but forgot to make a master page, you can turn any page into a master page. Just drag it from the Pages pane to the Master Pages pane. Alternately, you can select the Master Pages / Save As Master from the OPTIONS menu of the Pages palette.
And you can have more than one master page in a document. For example, you might have one master for odd numbered pages with the number appearing in the lower left corner and another master for even pages with the numbers appearing in the lower right corner.
If you for some reason must modify master page elements on a particular page, just click it holding down COMMAND/CONTROL + SHIFT and you’ll be able to edit it just on the page you’re working on while leaving it unchanged on all other pages!
2) paginating pages
One thing you might want to put on your master page is a placeholder for the page number. By placeholder I mean utilizing a variable that represents the current page, such as “page x”. This way, you don’t have to manually change the page number on each page and it allows the program to automatically number the pages as you modify your document.
You do this with special characters in InDesign. To add a dynamic page number to the master, create a text box type “page”, a space and then go to TYPE / INSERT SPECIAL CHARACTER / MARKERS / INSERT CURRENT PAGE NUMBER.
3) creating spreads
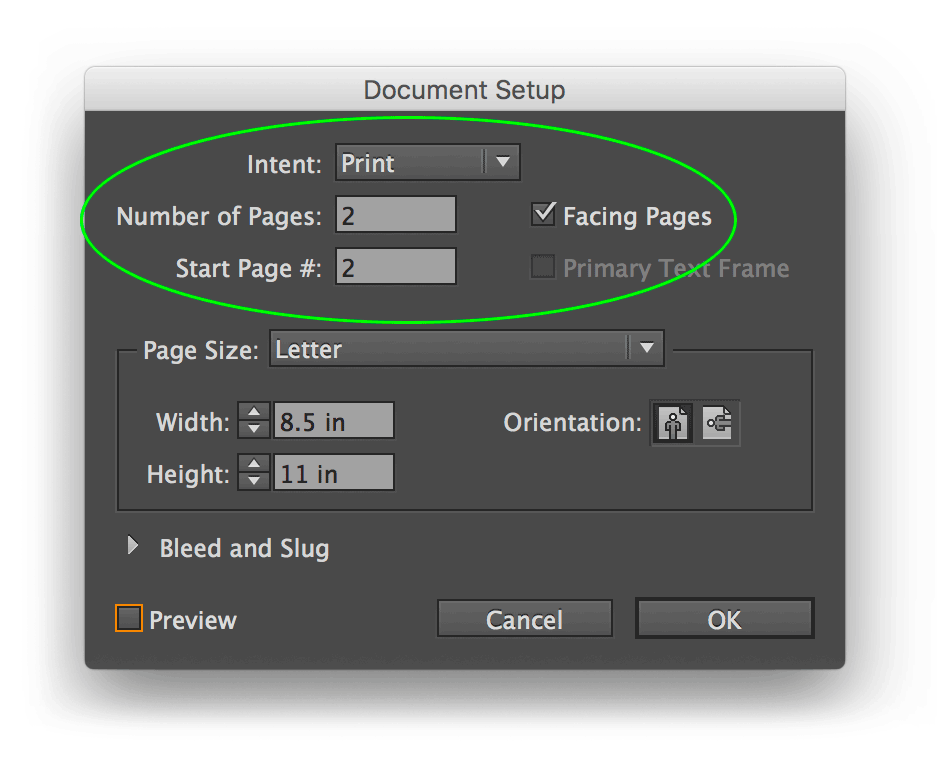
A “spread” is a layout with pages that face one another, like a magazine. To create a document with this type of side-by-side layout, choose FILE / NEW DOCUMENT and then check FACING PAGES from the dialog box. To change an existing document to a spread, choose FILE / DOCUMENT SETUP and check FACING PAGES, enter 2 for Start Page # and Number of Pages. Click OK.
4) setting styles
InDesign’s styles are one of its most powerful features because they allow you to set attributes one time and then apply it throughout your document and maintain consistency in your headings, for example.
There are two types of styles: Character and Paragraph. In general, you will be using Paragraph Styles, as Character Styles are typically only ever used on a character or word. If you find yourself applying Character Styles to an entire paragraph, you should be using Paragraph Styles.
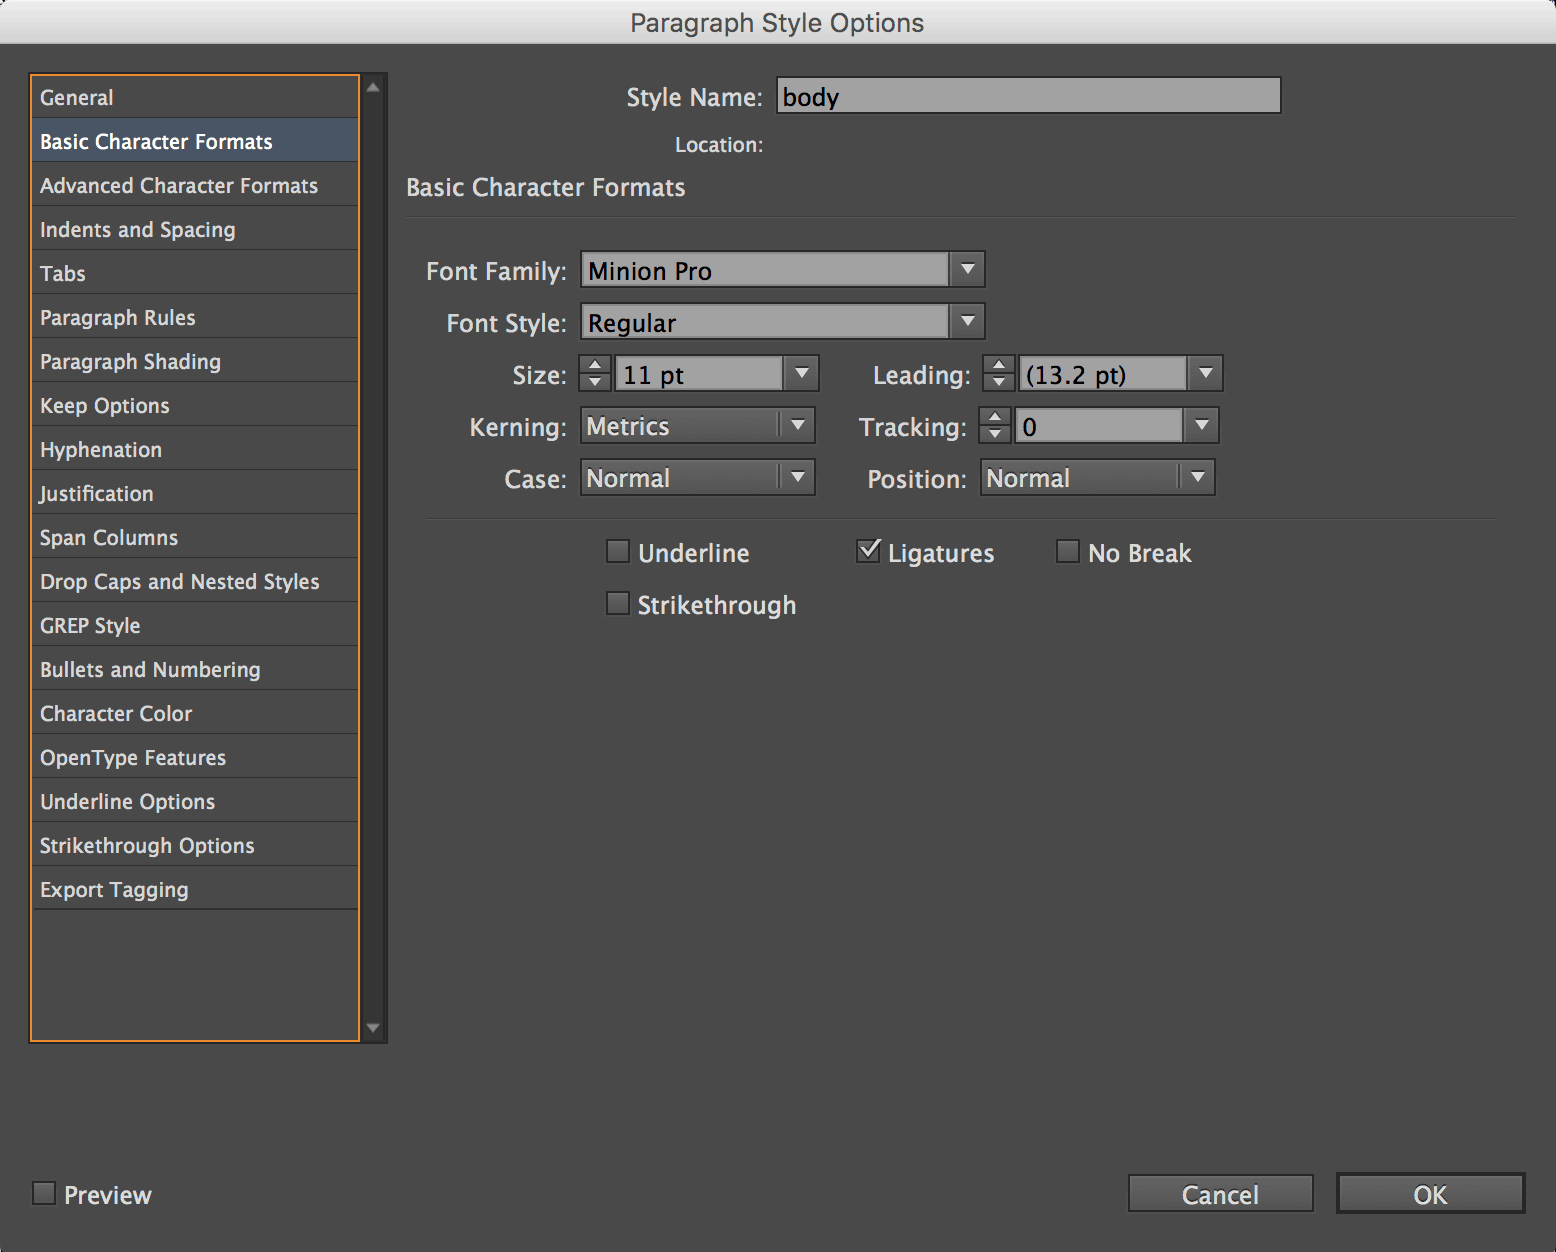
To create a new paragraph style, go to WINDOW / STYLES / PARAGRAPH and select New Paragraph Style from the OPTIONS menu and set its attributes such as font, point size and style name in the dialog box. Alternately, you can set text with these attributes in your document, then either selecting the copy or being somewhere in the paragraph, click on the New Paragraph Style icon at the bottom of the panel. You can just doubleclick it in the list to give it a name.
To apply a paragraph style, click in a paragraph, or select all or part of the paragraph(s) to which you want to apply the style, and select the style from the list.
You would follow the steps to create or apply a style for Character Styles in the same manner.
Want to try these tips out but don’t have InDesign? No problem, click on this link and get a 30-day trial absolutely FREE!
If you’re not already on my webinar list, sign up here:
Success! Now check your email to confirm your subscription.
5) wrapping text around graphics
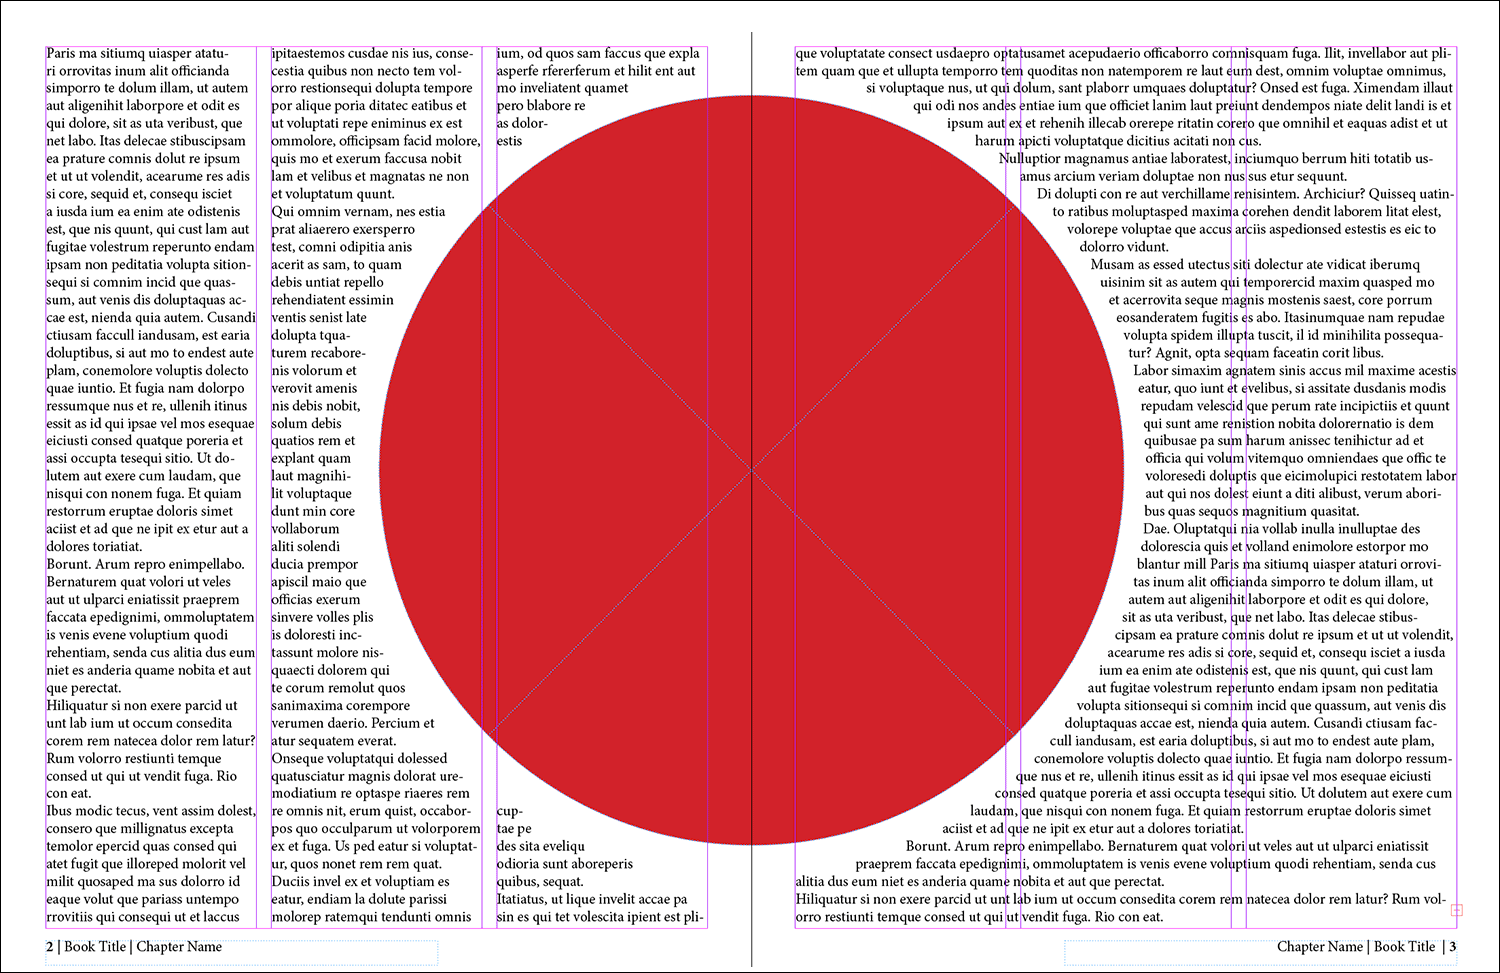
You can wrap text around any object, including text frames, imported images and shapes you draw in InDesign. Wrapping text creates white space around the object to make the text appear to flow around it as if it had a force field around it! In the first multipage layout program I used, QuarkXpress, this was called a “runaround” because the copy would appear to run around the object.
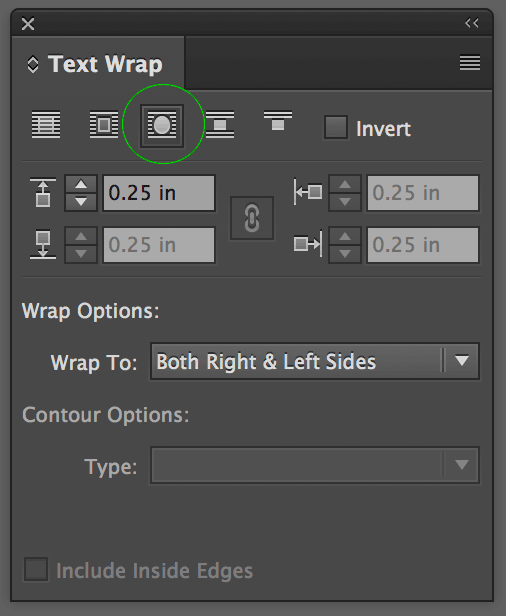
To wrap the text, first create or import the graphic and put it into position. Next, select WINDOW / TEXT WRAP and choose the WRAP AROUND OBJECT SHAPE icon:
Select the wrap options to create a force field around the right, left or both right and left sides. If wrapping around an image from Photoshop, be sure to select DETECT EDGES from the Contour Options dropdown.
6) saving colors to swatches
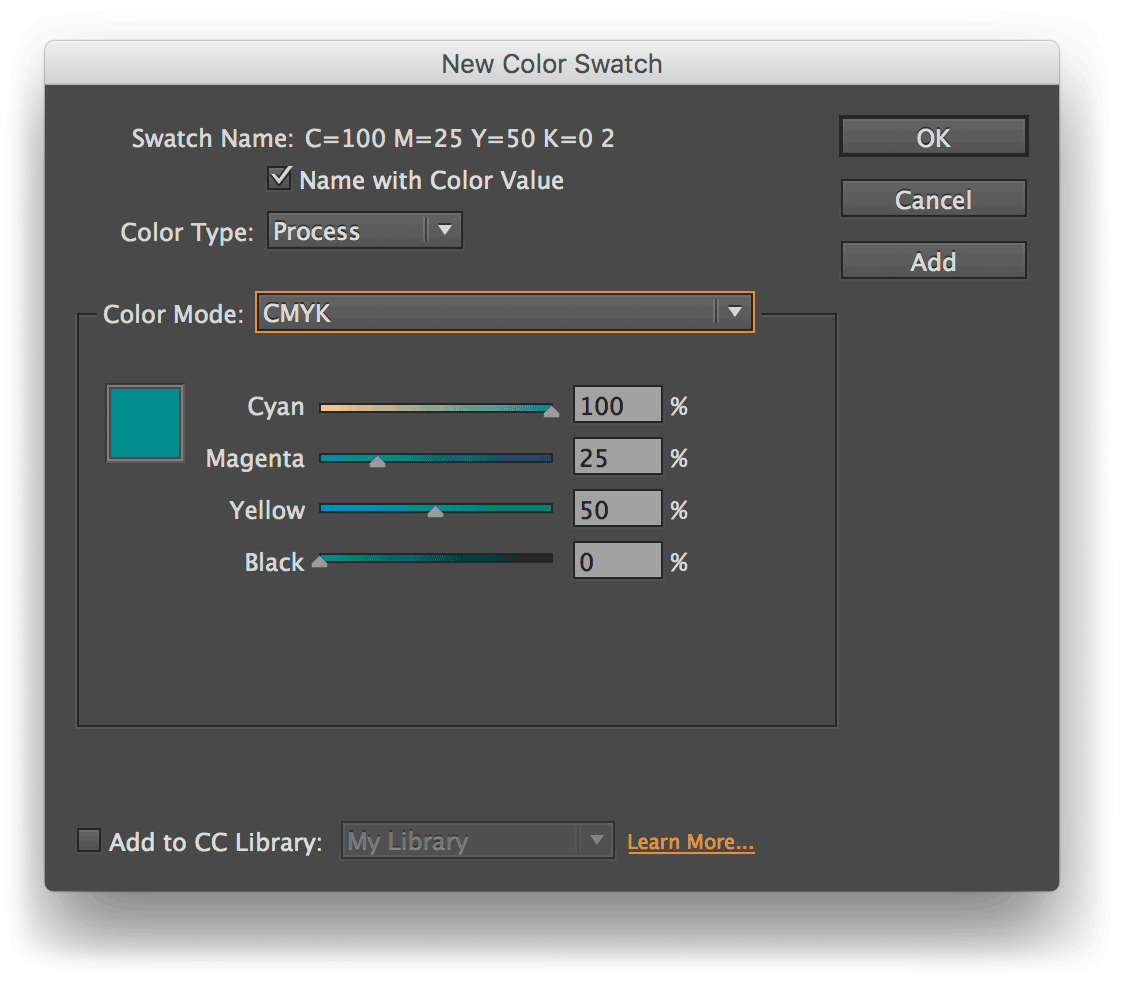
It’s convenient to save colors that you use repeatedly throughout your layout so these are saved with your file and can be applied easily from the swatches panel. To view this panel, go to WINDOW / COLOR / SWATCHES and select the New Color Swatch from the OPTIONS menu at the top right of the swatches panel.
I would recommend against naming the swatch, as that name may not mean anything to anyone else who may need to modify your document. Just check the Name With Color Value to give it a name that indicates the CMYK breakdown of the color. Next, choose Process from the Color Type dropdown (choose Spot if you are saving a PMS, or Pantone color) and then set the values for cyan, magenta, yellow and black. Click Add, then Done. If you have Add to CC Library checked, it will save the swatch there as well in order to be utilized by others or yourself in other files.
Alternately, you can set a color to an object using the COLOR panel (WINDOW / COLOR) first and then click the New Color Swatch icon at the bottom of the panel.
Download your FREE handy dandy InDesign cheatsheet that you can keep by your computer while you work here:
7) importing text & pictures
One of the most basic needs you have is to add text and imagery to your InDesign layout! Well, everything begins with a box, or frame, that you fill with either copy or an image. You first create a frame box and then you go to FILE / PLACE or COMMAND / CONTROL + D. You would then navigate to either the Word document to select copy or to a graphic to place an image.
Another way to import images and text is to simply drag them onto the document (from Mac’s Finder or Windows Explorer). This will automatically create an image or text frame, import the content and create a link to that file. If you drag content on top of an existing frame, it will replace the existing content but leave the size and cropping intact.
8) resizing content in a frame
Once you have your text or image in the frame, you may need to resize it. To do that, select the frame and look at the top contextual menu for these icons and choose from these options: FILL FRAME PROPORTIONATELY, FIT CONTENT PROPORTIONALLY, FIT CONTENT TO FRAME, FIT FRAME TO CONTENT, CENTER CONTENT:
Or, you can use shortcuts:
To keep the frame the same size and fit the content proportionally, press COMMAND / CONTROL + OPTION + SHIFT + E. (Note that if the image and frame have different proportions, then some white space will be left.)
To fill the frame proportionally, press COMMAND / CONTROL + OPTION + SHIFT + C. (If the image and frame have different proportions, then the image will be resized and end up larger than the frame, being cropped the edges.)
To center the content in the frame, use COMMAND / CONTROL + SHIFT + E.
And if you want the image to stay the same and resize the frame instead, then fit the frame to the content with COMMAND / CONTROL + OPTION + C.
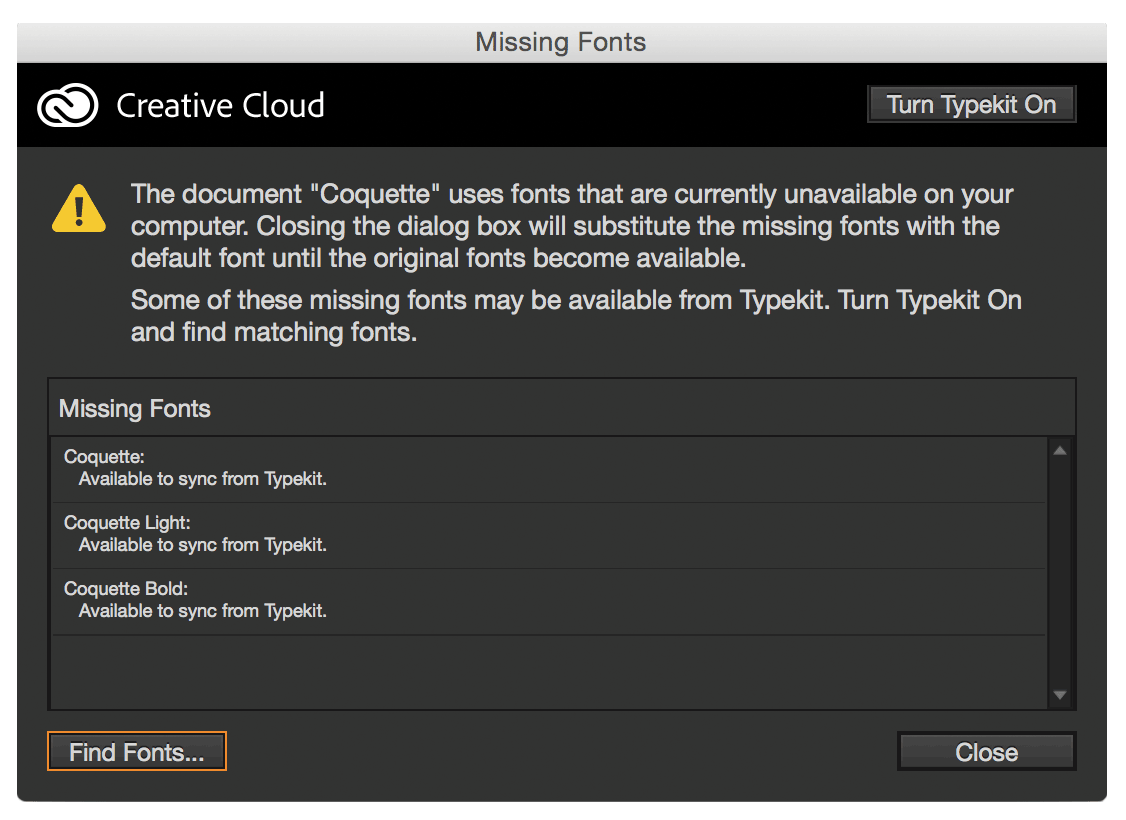
If you get a dialog box when you open an InDesign file, don’t just hit OK. Read it!
Most likely it’s warning you that you don’t have the images the file is linking to or you don’t have the fonts. If the latter, you have the option of replacing the font with one you DO have right then and there. And personally, I would recommend doing so. If you don’t, you’ll 1) be annoyed with a pink-colored highlight on all text that uses the font you don’t have and 2) never really know how the file should actually appear or how it should really break the lines of text—not having the correct font limits your ability to design the layout.
To fix the problem before proceeding to work on the file, click the Find Fonts button. This opens up the Find Font dialog box where you can identify all the fonts used in the document and those with yellow alert icons (yield signs) indicate missing fonts. Select the font with the yellow alert in the upper window, then choose a font to replace it with from the dropdown in bottom Replace With section. Click the Change All button. Do this for each font with a yellow alert icon.
To replace the fonts within the InDesign file, you can use the familiar buttons to the right: Find First, Change, Change All, and Change/Find, which function similar to the way they work in the Find/Change dialog box.
You can open this dialog box by choosing TYPE / FIND FONTS to check on the status and globally change fonts at any time, even after you’ve opened your document.
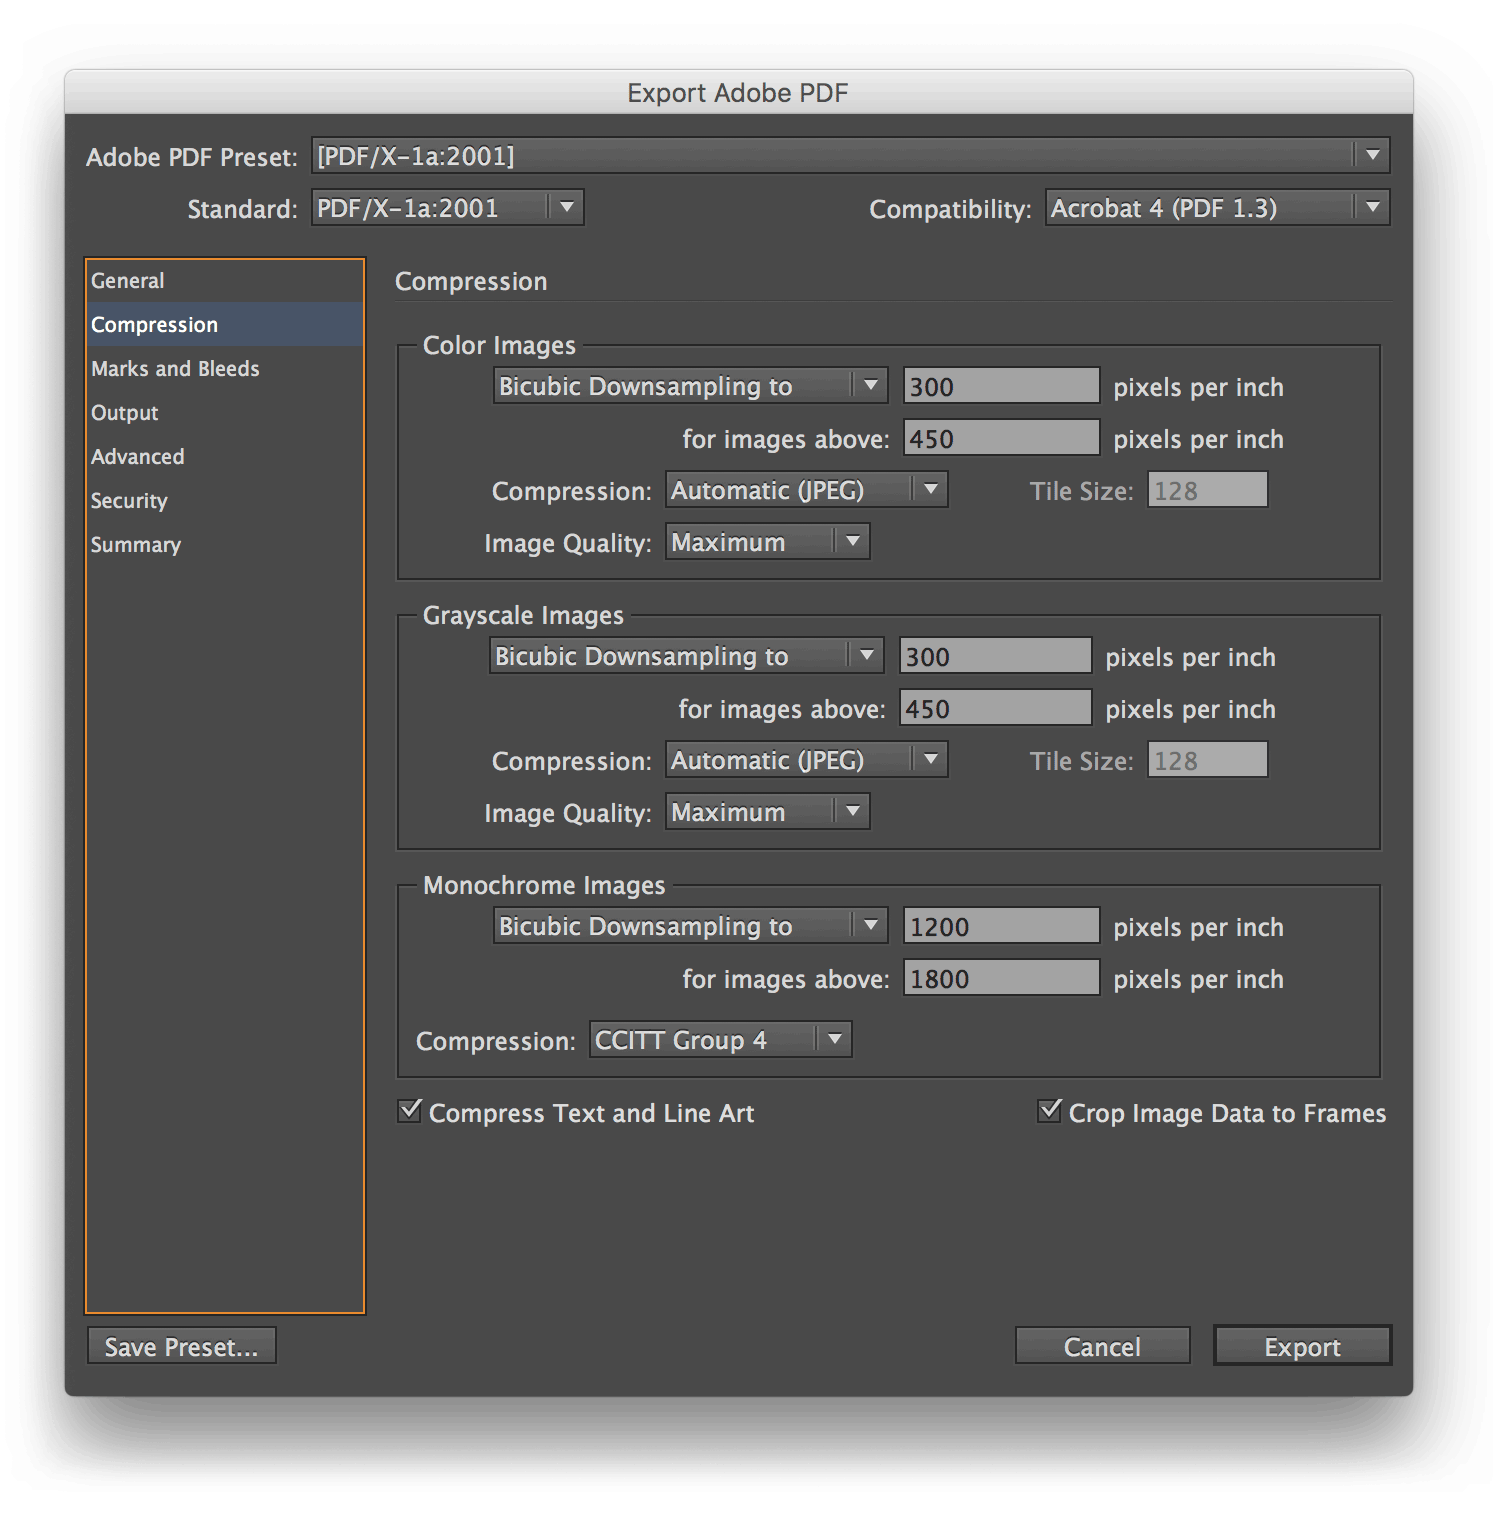
10) generating pdfs
Last but not least is the ability to export your layout as a pdf that anyone can view—just as you’ve designed it—even if they don’t have InDesign! Just go to FILE / EXPORT (or COMMAND / CONTROL + E) and select Adobe PDF from the Format dropdown.
Next, select what type of pdf you want. Sending your pdf to a printer? Choose High Quality Print or Press Quality to ensure your high resolution images at 300 dpi are not compressed. Need a small file size for the web? Choose Smallest File Size and under the Compression section, you’ll be able to compress your images down to 100-150 ppi if you like. If you want something that will print clearly, but not be an extremely large file to download, the PDF/X-1a is a good file format that will allow everyone to easily view and download your pdf.
There you have it! Let me know which InDesign tips you especially like and feel free to provide YOUR favorite ones below in the comments as well!
enjoy this blog? please spread the word :)
GRAB YOUR CHEATSHEET!
Enter your information to have your Illustrator cheatsheet delivered directly to your inbox! You'll also receive updates from me! (Don't worry, I loathe spam and promise to keep your email address safe.)
Success! Now check your email to get your cheatsheet!
Success! Your cheatsheet is on its way!
Don't miss out on FREE tutorials, workshops, and webinars! Reserve your spot now - there's no cost or obligation!
(Don't worry, I loathe spam and promise to keep your email address safe.)
Success! You're all set for free tutorials, workshops and webinars!
Success! You're all set to hear about free tutorials and events!
GRAB YOUR BRAND COLOR GUIDE!
Enter your information to have your brand color guide delivered directly to your inbox! You'll also receive updates from me!
(I loathe spam and promise to keep your email address safe.)
Success! Now check your email to get your free Color Me Brand™ Guide.
Success! Now check your email to get your FREE brand color guide!
Grab the ultimate guide to graphic file formats!
Enter your information to have the ultimate graphic file formats guide delivered directly to your inbox! You'll also receive updates from me! (I loathe spam and promise to keep your email address safe.)
Success! Now check your email to confirm your ultimate guide to graphic file formats!
Success! Now check your email to get your FREE graphic formats guide!
Grab the FREE Adobe guide!
Enter your information to have the FREE Adobe software guide with sneak peeks into 8 programs, including screenshots from real projects! This 10-page guide will be delivered directly to your inbox and only every once in a while you’ll hear from me! (I loathe spam and promise to keep your email address safe.)
Success! Now check your email to grab your Adobe software guide!
Success! Now check your email to get your FREE Adobe software guide!
Get a FREE Instagram template!
Enter your information to have a FREE Instagram template emailed directly to your inbox! (I loathe spam and promise to keep your email address safe.)
Success! Now check your email to grab your FREE Instagram template!
Success! Now check your email to get your FREE Instagram template!
GRAB YOUR CHEATSHEET!
Enter your information to have your Photoshop cheatsheet delivered directly to your inbox! You'll also receive updates from me! (Don't worry, I loathe spam and promise to keep your email address safe.)
Success! Now check your email to get your cheatsheet!
Success! Your cheatsheet is on its way!
Get a FREE Illustrator shortcuts sheet!
Enter your information to have a FREE Illustrator shortcuts sheet emailed directly to your inbox! (I loathe spam and promise to keep your email address safe.)
Success! Now check your email to get your shortcut sheet!
Success! Now check your email to get your shortcuts sheet!
GRAB YOUR CHEATSHEET!
Enter your information to have your InDesign cheatsheet delivered directly to your inbox! You'll also receive updates from me! (Don't worry, I loathe spam and promise to keep your email address safe.)
Success! Now check your email to get your cheatsheet!
Success! Your cheatsheet is on its way!
Get a FREE Photoshop shortcuts sheet!
Enter your information to have a FREE Photoshop shortcuts sheet emailed directly to your inbox! (I loathe spam and promise to keep your email address safe.)
Success! Now check your email to get your shortcuts sheet!
Success! Now check your email to get your shortcuts sheet!
Get FREE Twitter templates!
Enter your information to have FREE Twitter graphic templates emailed directly to your inbox! (I loathe spam and promise to keep your email address safe.)
Success! Now check your email to grab your FREE Twitter templates!
Success! Now check your email to get your FREE Twitter templates!
Grab the print & web graphics guide!
Enter your information to have the ultimate graphic file formats guide delivered directly to your inbox! You'll also receive updates from me! (I loathe spam and promise to keep your email address safe.)
Success! Now check your email to confirm your FREE print & web graphics guide!
Success! Now check your email to get your FREE print & web graphics guide!
Grab theFREEPDF guide!
Enter your information to have the FREE Adobe Acrobat PDF guide! This 12-page guide will be delivered directly to your inbox and only every once in a while you’ll hear from me! (I loathe spam and promise to keep your email address safe.)
Success! Now check your email to grab your Acrobat PDF guide!
Success! Now check your email to get your FREE PDF guide!
Grab your FREE PRINTABLE template with built-in bleed and safety guides!
Enter your information to have your FREE PRINTABLE template delivered directly to your inbox! You'll also receive updates from me! (I loathe spam and promise to keep your email address safe.)
Success! Now check your email to get your FREE PRINTABLE template!
Success! Now check your email to get your FREE PRINTABLE template!
GRAB YOUR BRAND CHECKLIST!
Enter your information to have your 10-pt brand checklist delivered directly to your inbox! You'll also receive updates from me!
(I loathe spam and promise to keep your email address safe.)
Success! Now check your email to get your FREE brand checklist!
Success! Now check your email to get your FREE brand checklist!
Get your FREE Pinterest template (with FREE graphics included!)
Enter your information to have FREE Pinterest template emailed directly to your inbox! (I loathe spam and promise to keep your email address safe.)
Success! Now check your email to grab your FREE Pinterest template!
Success! Now check your email to get your FREE Pinterest template!
SOUND LIKE A PRO! GRAB YOUR TYPOGRAPHY GUIDE!
Can you talk the talk? Becoming more familiar with the terms used by the pros will bring you that much closer to graphic guru status!
Enter your information to have your typography guide delivered directly to your inbox! You'll also receive updates from me!
Don't worry, I loathe spam and promise to keep your email address safe.)
Success! Now check your email to get your FREE typography guide!
Success! Now check your email to get your FREE typography guide!
Download FREE Vector Art!
Enter your information to have this FREE "mom seal of approval" vector art, scalable to any size, emailed directly to your inbox! (I loathe spam and promise to keep your email address safe.)
Success! Now check your email to get your FREE seal of approval vector art!
Success! Now check your email to get your FREE seal of approval artwork!
Download a FREE high resolution istock photo!
Enter your information to have this FREE high resolution istock photo emailed directly to your inbox! (I loathe spam and promise to keep your email address safe.)
Success! Now check your email to get your FREE high resolution istock photo!
Success! Now check your email to get your FREE high resolution istock photo!
Download FREE Photoshop actions!
Enter your information to have FREE Photoshop cinematic actions emailed directly to your inbox! (I loathe spam and promise to keep your email address safe.)
Success! Now check your email to get your FREE Photoshop cinematic actions!
Success! Now check your email to get your FREE Photoshop actions!
Download FREE Photoshop actions!
Enter your information to have FREE Photoshop sepia tone, monochrome and black & white actions emailed directly to your inbox! (I loathe spam and promise to keep your email address safe.)
Success! Now check your email to get your FREE Photoshop sepia tone, monochrome and b/w actions!
Success! Now check your email to get your FREE Photoshop actions!
Download FREE Photoshop actions!
Enter your information to have FREE Photoshop color grading actions emailed directly to your inbox! (I loathe spam and promise to keep your email address safe.)
Success! Now check your email to get your FREE Photoshop cinematic actions!
Success! Now check your email to get your FREE Photoshop actions!
GRAB YOUR FREE INDESIGN SWIPE FILE!
Enter your information to have your InDesign swipe file delivered directly to your inbox! You'll also receive updates from me!
(I loathe spam and promise to keep your email address safe.)
Success! Now check your email to get your InDesign swipe file with FREE vector art!
Success! Now check your email to get your FREE InDesign swipe file!
Download a FREE design template!
Enter your information to have a FREE design template for use as a direct mail postcard, flyer or magazine layout emailed directly to your inbox! (I loathe spam and promise to keep your email address safe.)
Success! Now check your email to get your FREE layout template!
Success! Now check your email to get your FREE layout template!
GRAB YOUR FREE INDESIGN LETTERHEAD (AND BONUS ENVELOPE) TEMPLATE!
Enter your information to have your InDesign letterhead template delivered directly to your inbox! You'll also receive updates from me!
(I loathe spam and promise to keep your email address safe.)
Success! Now check your email to get your FREE InDesign letterhead (plus bonus envelope) template!
Success! Now check your email to get your FREE InDesign letterhead (and bonus envelope) template!


 I would recommend against naming the swatch, as that name may not mean anything to anyone else who may need to modify your document. Just check the Name With Color Value to give it a name that indicates the CMYK breakdown of the color. Next, choose Process from the Color Type dropdown (choose Spot if you are saving a PMS, or Pantone color) and then set the values for cyan, magenta, yellow and black. Click Add, then Done. If you have Add to CC Library checked, it will save the swatch there as well in order to be utilized by others or yourself in other files.

 To fix the problem before proceeding to work on the file, click the Find Fonts button. This opens up the Find Font dialog box where you can identify all the fonts used in the document and those with yellow alert icons (yield signs) indicate missing fonts. Select the font with the yellow alert in the upper window, then choose a font to replace it with from the dropdown in bottom Replace With section. Click the Change All button. Do this for each font with a yellow alert icon.